The Walkthrough
If you came here straight from the first page just looking to a guide to mindlessly follow to secure your Skype from broadcasting your IP to the world, then this will get the job done. However, I highly encourage you to read the explanations given in the pages prior to this so that you have a thorough understanding of what you’re going to be doing with the programs you’ll be working with.
This page was last updated on April 26th, 2015. I will try to keep it updated in case any of the information changes. If anything in here doesn’t line up correctly, e-mail me at steven.bonnell.ii – at – gmail.com and I will patch it up as soon as possible.
Downloading PuTTY
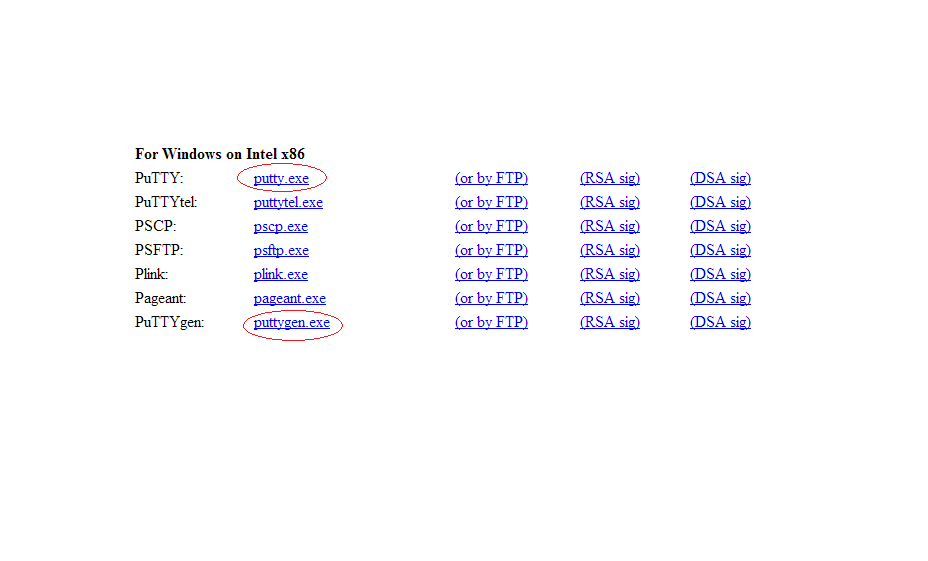
First, let’s get the program we’ll use for our SSH tunneling, PuTTY, and the program we’ll use for our Amazon key, PuTTYgen.
PuTTY and PuTYYgen download link. [Picture]
Setting up EC2 on Amazon
First, make sure you have an Amazon account. Simply visit Amazon and you should see a Sign In drop down menu at the top right that will prompt you to create an account.
Next, we’ll need to create an AWS (Amazon Web Services) account. You can click the “Try Amazon EC2 for Free” button on Amazon’s AWS page. This will take you to a webpage to create an Amazon Web Services account. After you create an account, you’ll need to enter your credit card information. You will not be randomly charged, and you will not unknowingly authorize Amazon to bill you. This is Amazon, not some shady third-party site that is going to misuse your information. You’ll need to enter your CC and contact information.
Make sure you select the “Basic (Free)” tier [picture] when prompted to after you’ve authenticated your account. The micro-instance we’ll be utilizing via Amazon’s EC2 service is free for one year.
After creating your AWS account, we’ll need to sign up for Amazon’s EC2 service and get a micro-instance running.
- You can return to the AWS page linked earlier and click the “My Account” drop down menu in the top right, then click “AWS Management Console.” You may have to sign in again to the account you’ve created
- Next click “EC2” under the “Compute” list [picture]
- You should see an option that will allow you to “Launch Instance.” Click that.
- Now a list of potential virtual server options will pop up. We want to use the one that says “Ubuntu Server.” At the time of this writing, it is version 14.04, but it could be higher when you read this article, that is fine. The important thing is that it says “Free tier eligible” underneath the Ubuntu graphic. Click “Select” on this server.
- The default option selected should be the free tier eligible micro instance. Click the blue “Review and Launch” button at the bottom right of the screen.
- As long as everything looks like this [picture] on the next page, you can press the blue “Launch” button.
- Under the top dropdown menu, select “Create a new key pair.” You can name this literally anything you want. Once you’ve named it, click the grey “Download Key Pair” button. Save this file in a secure location.
- Now you can click the blue “Launch Instances” button.
- Congratulations, your instance should now be running. You can click the blue “View Instances” button in the lower right to view your VPS.
Creating a keyfile and setting up PuTTY
Remember where you saved that keyfile that you downloaded earlier? Now we’re going to turn that keyfile into something usable with PuTTY.
- Open “puttygen.exe”.
- Click “load” and search for the key you saved from Amazon. You will have to select “all files” in the bottom right as the file you’re looking for is a .pem file, and not a .ppk file.
- Click “save private key” and save it somewhere you’ll remember for later on.
Now it’s time to configure the program that we downloaded earlier, PuTTY.
- When you first open up PuTTY, there will be two empty boxes for information. “Host Name (or IP address)” and “Port”. In the “Host Name” box, you need to enter your EC2 information from Amazon. Go to your EC2 page and click “1 Running Instance” to bring up a list containing the instance you launched earlier.
- Select your running instance. The box next to it should fill in with the color blue. At the bottom of the screen you will see your Amazon EC2 IP following the phrase “Public DNS:” Enter this into the PuTTY Host Name box. For “Port” you should enter “22”.
- Make sure the connection type is set to SSH.
- On the left side of the PuTTY window, scroll down and expand “Connection”, then select “Data”.
- Here you want to enter your “Auto-login username” as “ubuntu”.
- Now expand “SSH”, then select the “Auth” option.
- In the empty box here you need to search for and enter the location of the keyfile you saved earlier using puttygen.
- Now select “Tunnels”. On this screen you want to enter 8080 in the “Source port” box, and make sure you’ve selected the “Dynamic” bubble beneath. Now press “Add” and “D8080” should appear in the box above.
- Now scroll all the way back up to “Session” on the left side, enter whatever you want in the “Saved Sessions” box, then press the “Save” button on the right to save these settings. Now when you open PuTTY, all you’ll have to do is press “Load” and “Open” to recall these settings and open your SSH tunnel.
Use Windows 7/8/8.1 Firewall to block Skype
- Search for “Advanced” on Windows 7/8/8.1 and “Windows Firewall with Advanced Security” should come up.
- Select “Outbound Rules” from the left column
- In the top left, select the “Action” menu and click on “New Rule…”
- A box will appear on your screen. Select “Program” and click the next button.
- Browse your computer for Skype to block, then press “Next”.
- Press “Next” one more time, all three boxes should be marked on this screen.
- You can create whatever name you want here; I called my rule “SkypeBlock”.
Now Windows 7/8/8.1 will not allow Skype to make any outbound connections! To verify these settings try to open up Skype right now. If you were successful, Skype should fail to connect to the internet.
Note: If you have some anti-virus’ installed, such as Kapersky, you may have to uninstall or modify those settings to actually change your Windows Firewall settings.
Force Skype to route through localhost
- On the Skype login windows, click “Tools”, then press the “Connection options” button.
- Under this connection tab, you need to make sure “SOCKS5” is selected in the drop down menu. Now you need to enter “127.0.0.1” for the “Host” box and “8080” for the “Port” box.
And that’s it, you’re done!
Now any time you want to log onto Skype behind your Amazon proxy, all you have to do is open PuTTY, load your settings, then connect to your EC2 instance (via the “Open” button) and you should be good to go!